|
We've reached a moment where it's important to discuss the flexibility we have with signal flow. So far in parts 1 and 2 of the Learning Modular Synthesis tutorial, I've been placing the amplifier (VCA) before the filter (VCF) in the audio signal chain. There is, of course, a reason why I've chosen to do that. But before I dive into that reason, and any reason you might do the opposite, I must state that within an audio/synthesis/sound design context, neither is incorrect. Sure, you may have a preference of one way over the other, but that doesn't mean there isn't a reason for the other way.
I've chosen to place the filter after the amplifier because amplified signals contain amplified noise. And yes, filters can contain noise too! However, placing the filter after the amplifier facilitates a bit more control over noise. This is consistent with typical telecommunications practices; apply filtering to reduce noise in a signal. But (and this is a big but), we might want that noise in our sound! There are a plethora of filter types and circuits available, every one of them with unique characteristics. Placing the amplifier after a filter can enhance these unique characteristics! Conclusion: Try patching the signal in both configurations. Try different filters. VCV Rack in particular is a great playground for this type of experimentation. Have fun and make discoveries! These processes help you discover your sound.
0 Comments
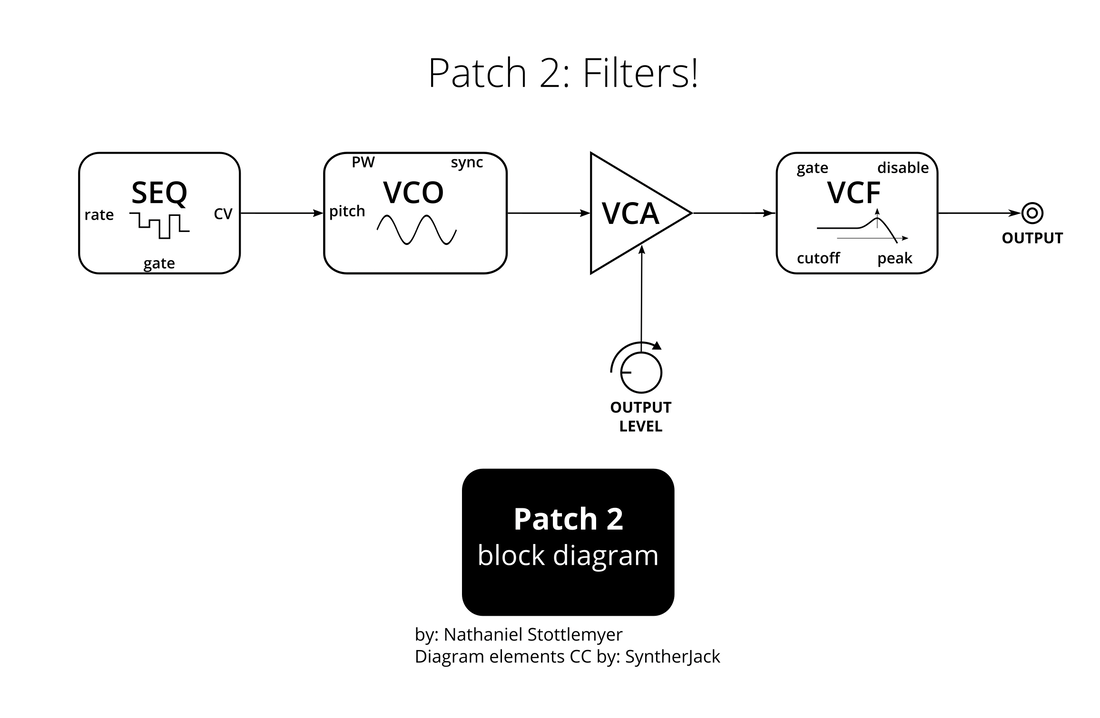
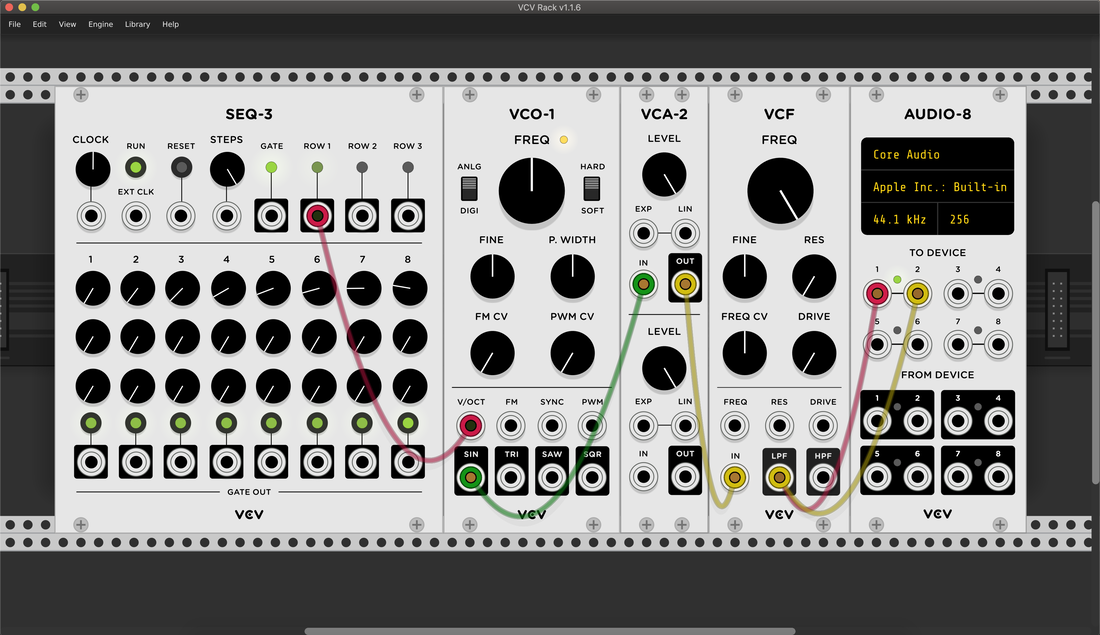
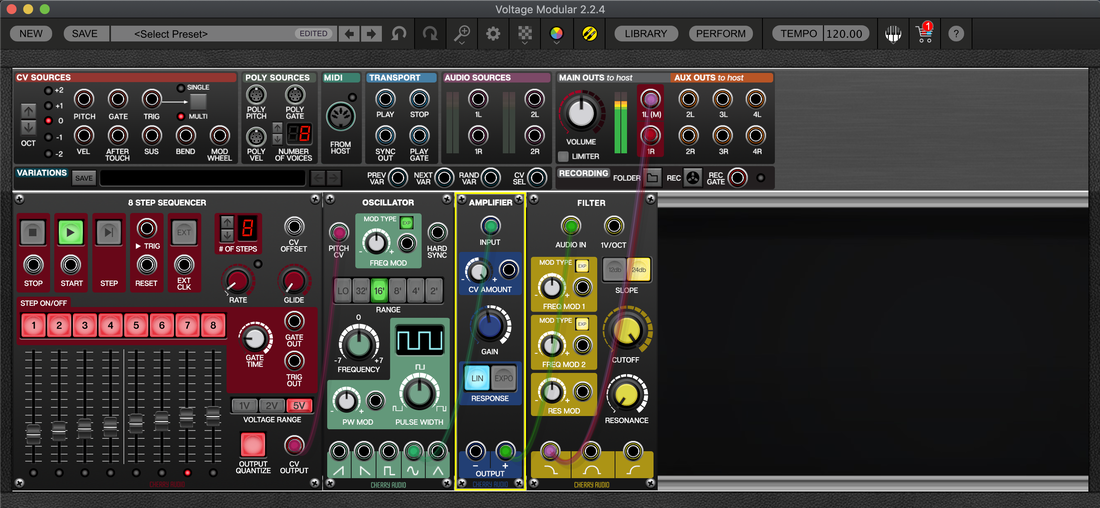
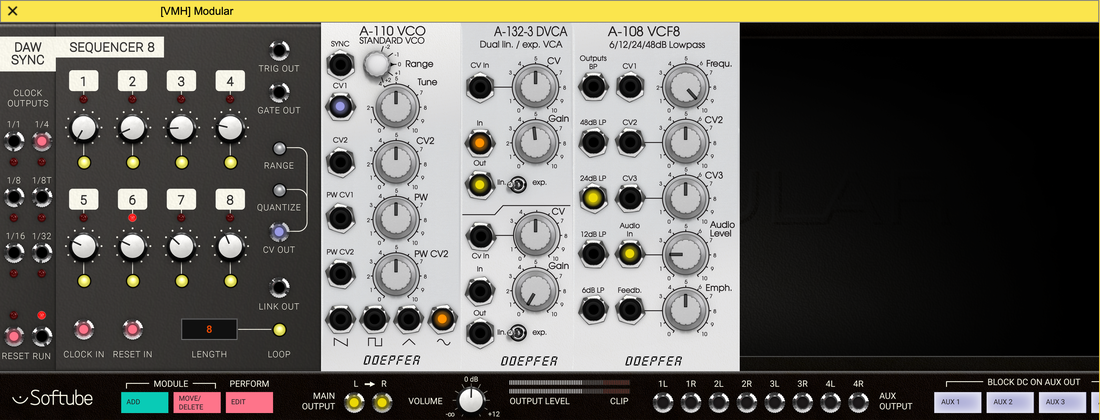
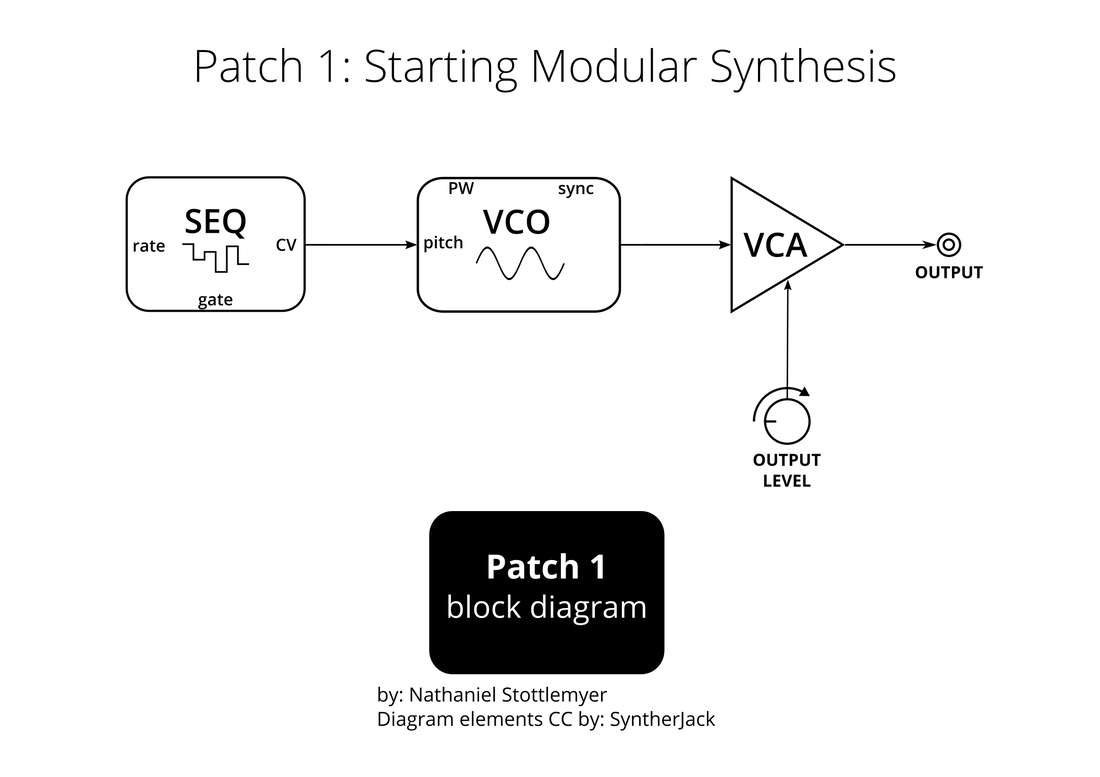
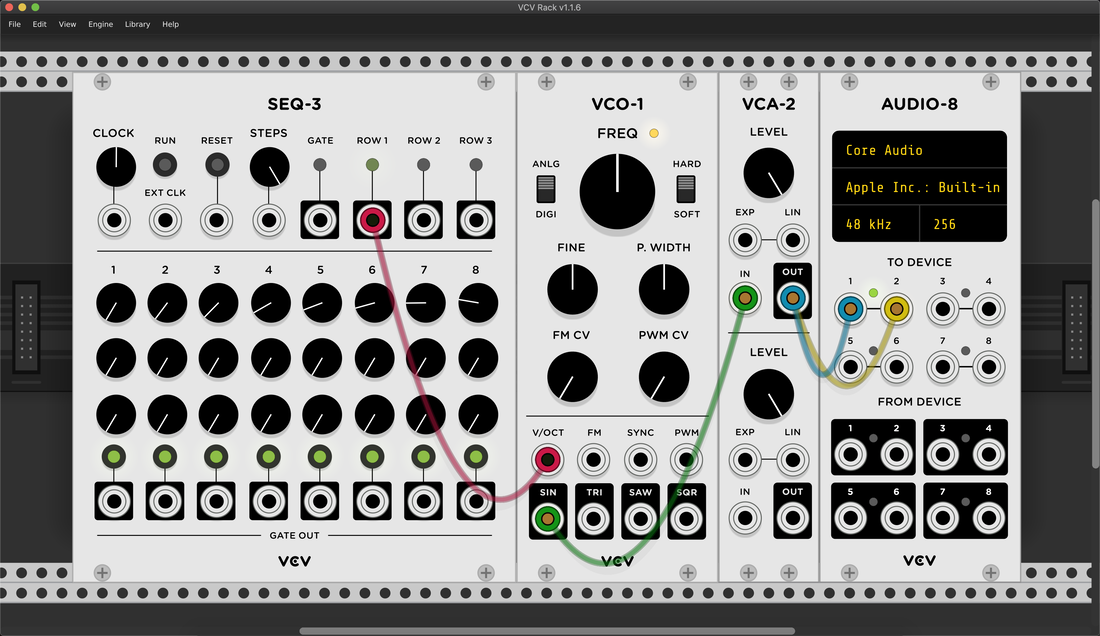
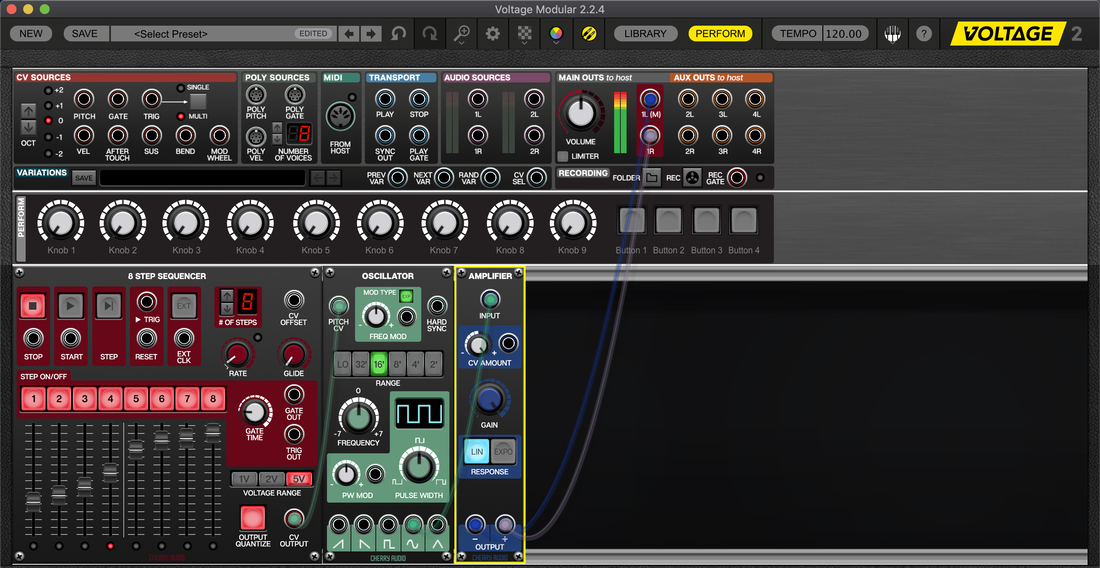
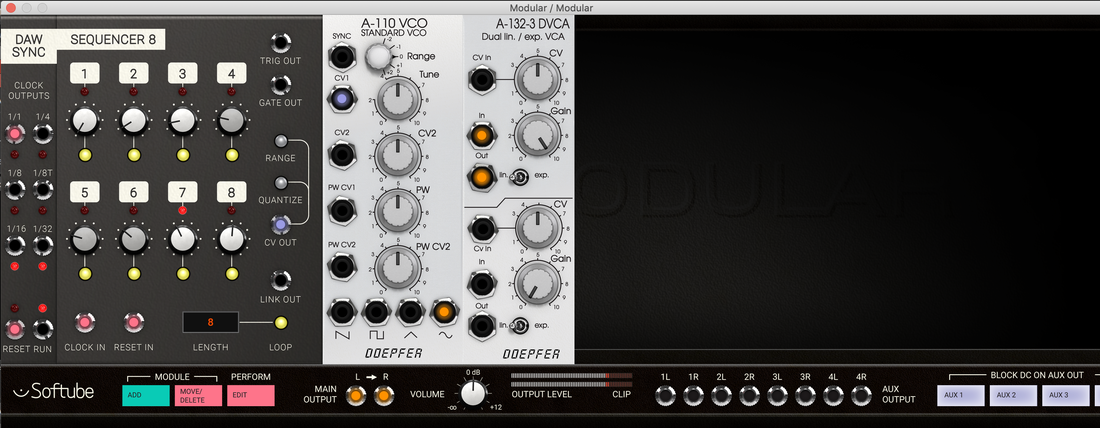
Welcome to Part 2 of the Learning Modular Synthesis tutorial series! In Part 1 we assembled a basic patch using 3 modules: a sequencer for determining the sequence of notes, a voltage controlled oscillator (VCO) for generating sound, and a voltage controlled amplifier (VCA) for controlling the amplitude or volume of our sound. We assembled our patch in 3 virtual modular synthesizer environments, including: VCV Rack, Voltage Modular, and Softube Modular. In this, Part 2, we'll continue patching and will include a low-pass, voltage-controlled filter (VCF) in our patch. Before we dive into our patch, let's define what filtering is. In an audio context, filters are usually thought of as cut-only devices, intended to remove a selection of the frequency spectrum. In synthesis, the 3 common types of filters are: low-pass filters (which remove frequencies from the top of the frequency spectrum, high-pass filters (which remove frequencies from the bottom of the frequency spectrum, and band-pass filters (which allows a variable-width band of frequencies - referred to as "Q"). Filtering differs from equalization in that eqs (equalizers) increase or decrease the amplitude of chosen frequency ranges. The filters we use in synthesis are much akin to the filters used in telecommunications. If you're interested in the relationship (and love electrical engineering and math!), check out the NASA Technical Note titled, "A Digitally Controlled Very High Frequency Synthesizer" available at ntrs.nasa.gov/api/citations/19710024688/downloads/19710024688.pdf. This article discusses the use of a filter to remove "ripples" from an oscillator signal. This is a common filter application in analog telecommunication devices. Let's look at the block diagram for our patch: In this patch, the sequencer (SEQ) is sending a control signal (control voltage/CV) to the oscillator (VCO) to control the sequence of pitches. The VCO is outputting the audio signal as a sine wave to the amplifier (VCA). The user is able to control the volume of the VCA using the output level potentiometer/knob which is then sent to the low-pass filter (VCF). The filtered signal is then sent to the output. The output on a computer uses a digital audio converter (DAC) to send the signal to the speaker or headphones. Like Part 1, we'll look at this example in some virtual modular synthesizers. We'll begin with VCV Rack, an open-source Eurorack simulator (https://vcvrack.com/). This software is free to download and for this example, I'm using only fundamental modules which are included for free. In my VCV Rack patch, I've connected the ROW 1 output of the sequencer (SEQ-3) to the V/OCT input of the oscillator (VCO-1). This is the control/CV signal. I've also changed the knobs on row 1 (the top row) of the SEQ-1 to change the pitch of each of the 8 steps. Next, I've connected the SIN output of VCO-1 to the IN of the amplifier (VCA-2). This is an audio signal. Next, I've connected the OUT of the VCA-2 to the IN of the voltage-controlled filter (VCF). Lastly, I've connected the LPF (low-pass filter) output to inputs 1 and 2 (left and right respectively) of the AUDIO-8 interface. Notice that the VCF also has a HPF (high-pass filter) output. The AUDIO-8 interface sends the signal to the DAC. Make sure to select an output (second line of the AUDIO-8 display). Next, let's see the patch in Voltage Modular (https://cherryaudio.com/voltage-modular). Voltage Modular is commercial software, however since the COVID-19 pandemic, Cherry Audio has made the Nucleus bundle of Voltage Modular free. All of the modules I use in this example are included free with the Nucleus bundle. Just like in Part 1, my Voltage Modular patch is very similar to my VCV Rack patch. Here, I've connected the CV OUTPUT of the 8 STEP SEQUENCER to the PITCH CV input of the OSCILLATOR and changed the sliders of the sequencer to change the pitch of each of the 8 steps. Next, I've connected the sine wave output of the OSCILLATOR to the INPUT of the AMPLIFIER and then connected the OUTPUT of the amplifier to the AUDIO IN of the FILTER. This filter has three output types: low-pass, band-pass, and high-pass. I've connected the low-pass output of the FILTER to the MAIN OUTS L and R. This sends the signal to the DAC. Lastly, let's see this patch in Softube Modular (https://www.softube.com/modular). Just a reminder from Part 1, Softube Modular is commercial software and is available for $89 which includes a number of modules, with several expansions available for purchase. Also remember that Softube Modular can only be used as a plugin inside of a DAW. Softube Modular fantastically emulates a number of hardware modules. The Doepfer modules I use in this patch are included with the software. I've included the DAW SYNC module to synchronize the transport and tempo from the DAW by connecting the 1/4 CLOCK OUTPUT of the DAW SYNC to the CLOCK IN of the sequencer (SEQUENCER 8) and the RESET out of the DAW SYNC to the RESET IN of the sequencer. Now in alignment with our block diagram, I've connected the CV OUT of SEQUENCER 8 to the CV1 input of the oscillator (A-110 VCO) and changed the knobs of the sequencer to change the pitch of each of the 8 steps. Next, I've connected the sine wave output of the A-110 VCO to the In of the amplifier (A-132-3 DVCA) and the Out of the A-132-3 DVCA to the Audio In of the A-108 VCF8 low-pass filter. To complete the patch, I've connected the 24db LP output to the MAIN OUTPUT L and R. This sends the signal to the DAC.
Further Thoughts: Filters have incredible nuances and significant impact on the sound of your patch! Try applying the filter to your patch with different oscillator outputs. The filter has different effects on different wave types. Analog filters also have the ability to self-oscillate, which is wonderfully modelled in VCV Rack and Softube Modular. To make a filter self-oscillate, turn down the amplitude of (or disconnect) the signal entering the filter and turn the resonance all the way up. The filter knob will now sweep through frequencies. With the right amount of amplification, you can create interesting polyphonic textures! Have fun continuing with modular synthesis and stay tuned for the next part!
In Learning Modular Synthesis: Part 1, I presented a block diagram illustrating the signal flow of several elements. We looked at representations of that block diagram in 3 different applications simulating a Eurorack modular synthesizer. While each application has a particular workflow, knowledge of modular signal flow is applicable to all 3. This same knowledge is useful if we are to write Patch 1 as text-based code.
Below (view content in browser to see code example) is an example utilizing the elements in the block diagram, programmed in ChucK (https://chuck.cs.princeton.edu/).
If you're not familiar with the ChucK music programming language, no worries! I'll walk you through this program, line by line. But before I do, you might ask, "how is this code related to the Patch 1 block diagram?" The block diagram from Patch 1 illustrates a higher level of abstraction, in which the blocks and the interconnectivity between them show a general overview of the system. The block diagram doesn't contain details about each step of the sequence. The code above, however, illustrates each stage of the MIDI sequence, representing a lower level of abstraction.
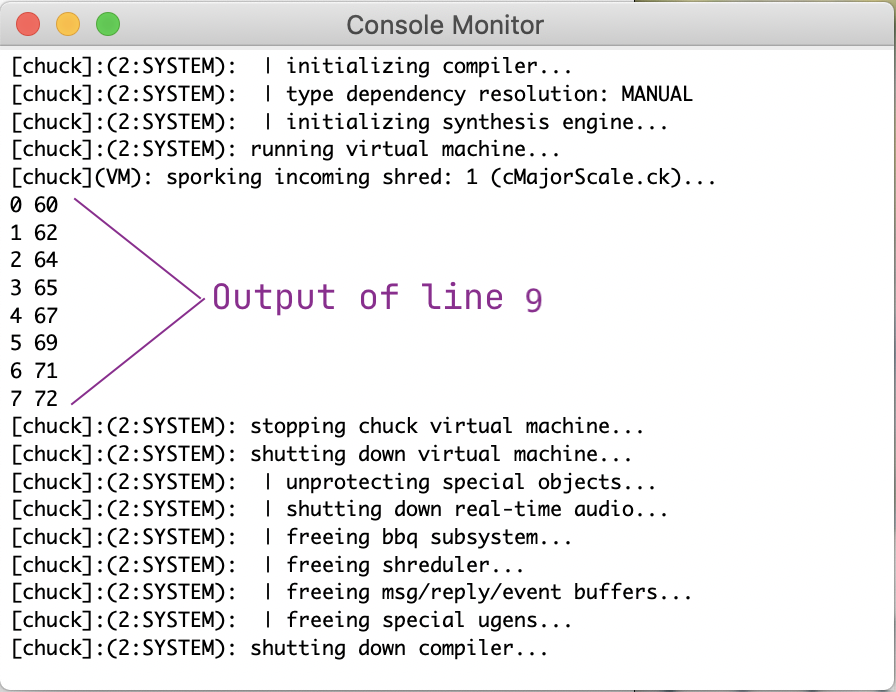
This program requires setup, which I start on line 4. On this line I create an object called sine, from the unit generator (UGen) class in ChucK called SinOsc, and connect it directly (via the ChucK operator =>) to the dac. Next, I declare and initialize an array called cMajorScale[] on line 6, which contains the MIDI notes for the C Major scale. Lines 8-13 is a loop and will repeat the number of times there are notes in the array, so 8 times. Lines 9-12 run with each iteration of the loop. On line 9, I'm printing to the console each iteration number and the corresponding MIDI note number. You can see the console output below:
On line 10, I call the mtof() function from the Std class to convert the MIDI notes to frequency. I chuck this to the sine oscillator (sine.freq). On line 11, I control the amplitude of each note played by chucking an amount of 1.0 (full amplitude) to the sine oscillator (sine.gain). Finally, I chuck a note duration of 1.0 second to now, meaning that upon run, each note will play for a duration of 1 second. This also means that each iteration of the loop lasts for 1 second. This result is a sequenced performance of the C Major Scale.
The ChucK operator (=>) and the idea of "chucking" are similar to patching. However here, instead of chucking to the next element in the signal chain, we're chucking control values to an object, the sine oscillator, to modify its connection to the dac. The first thing you might ask about this series of tutorials is "why?" There are so many tutorials available to get people started in modular synthesis, so why do we need another one? Throughout my years teaching, the greatest challenge I've faced is designing lessons that reach multiple learning styles. In a modern world with video tutorials and ebooks, I'm attempting to present modular synthesis to you in another way: graphics. In this, Part 1 of an indefinite number of tutorials about modular synthesis, we will assemble a basic patch (synth speak for interconnection of modules) using 3 modules: a sequencer for determining the sequence of notes, a voltage controlled oscillator (VCO) for generating sound, and a voltage controlled amplifier (VCA) for controlling the amplitude or volume of our sound. Our patch will be connected to an output so we are able to hear it. We will assemble our patch in a virtual modular synthesizer environment. Depending on the environment, we may need an extra module to make our interface complete. To start, lets look at a block diagram for our first patch: In this patch, the sequencer (SEQ) is sending a control signal (control voltage/CV) to the oscillator (VCO) to control the sequence of pitches. The VCO is outputting the audio signal as a sine wave to the amplifier (VCA). The user is able to control the volume of the VCA using the output level potentiometer/knob which is then sent to the output. The output on a computer uses a digital audio converter (DAC) to send the signal to the speaker or headphones. Let's look at this patch with some virtual modular synthesizers. First, we'll have a look at this patch in VCV Rack, an open-source Eurorack simulator (https://vcvrack.com/). This software is free to download and for this example, I'm using only fundamental modules which are included for free. In my VCV Rack patch, I've connected the ROW 1 output of the sequencer (SEQ-3) to the V/OCT input of the oscillator (VCO-1). This is the control/CV signal. I've also changed the knobs on row 1 (the top row) of the SEQ-1 to change the pitch of each of the 8 steps. Next, I've connected the SIN output of VCO-1 to the IN of the amplifier (VCA-2). This is an audio signal. Lastly, I've connected the OUT of the VCA-2 to inputs 1 and 2 (left and right respectively) of the AUDIO-8 interface. This sends the signal to the DAC. Make sure to select an output (second line of the AUDIO-8 display). Next, let's see the patch in Voltage Modular (https://cherryaudio.com/voltage-modular). Voltage Modular is commercial software, however since the COVID-19 pandemic, Cherry Audio has made the Nucleus bundle of Voltage Modular free. All of the modules I use in this example are included free with the Nucleus bundle. My Voltage Modular patch is very similar to my VCV Rack patch. I've connected the CV OUTPUT of the 8 STEP SEQUENCER to the PITCH CV input of the OSCILLATOR. This is the control/CV signal. I've also changed the sliders of the sequencer to change the pitch of each of the 8 steps. Next, I've connected the sine wave output of the OSCILLATOR to the INPUT of the AMPLIFIER. This is an audio signal. Lastly, I've connected the OUTPUT of the amplifier to the MAIN OUTS L and R. This sends the signal to the DAC. Finally, lets see the patch in Softube Modular (https://www.softube.com/modular). Softube Modular is commercial software and is available for $89 which includes a number of modules, with several expansions available for purchase. Importantly, Softube Modular can only be used as a plugin inside of a DAW. Softube Modular fantastically emulates a number of hardware modules. The Doepfer modules I use in this patch are included with the software. Since Softube Modular is a plugin, it requires the DAW SYNC module to synchronize the transport and tempo from the DAW. I've connected the 1/1 CLOCK OUTPUT of the DAW SYNC to the CLOCK IN of the sequencer (SEQUENCER 8) and the RESET out of the DAW SYNC to the RESET IN of the sequencer. From here, my connections follow our block diagram. I've connected the CV OUT of SEQUENCER 8 to the CV1 input of the oscillator (A-110 VCO). This is the control/CV signal. I've also changed the knobs of the sequencer to change the pitch of each of the 8 steps. Next, I've connected the sine wave output of the A-110 VCO to the In of the amplifier (A-132-3 DVCA). This is an audio signal. Lastly, I've connected the Out of the A-132-3 DVCA to the MAIN OUTPUT L and R. This sends the signal to the DAC.
Conclusion: The purpose of illustrating this patch with several different modular synthesizer environments is to demonstrate the similarity of each instance and relatability to the initial block diagram. Once you've patched this in your chosen environment, try adjusting the sliders and knobs to perform your patch. You'll find some controls have great impact while others have less (or none because they're controlling a connection that isn't yet patched). Have fun getting started with modular synthesis and stay tuned for the next part!
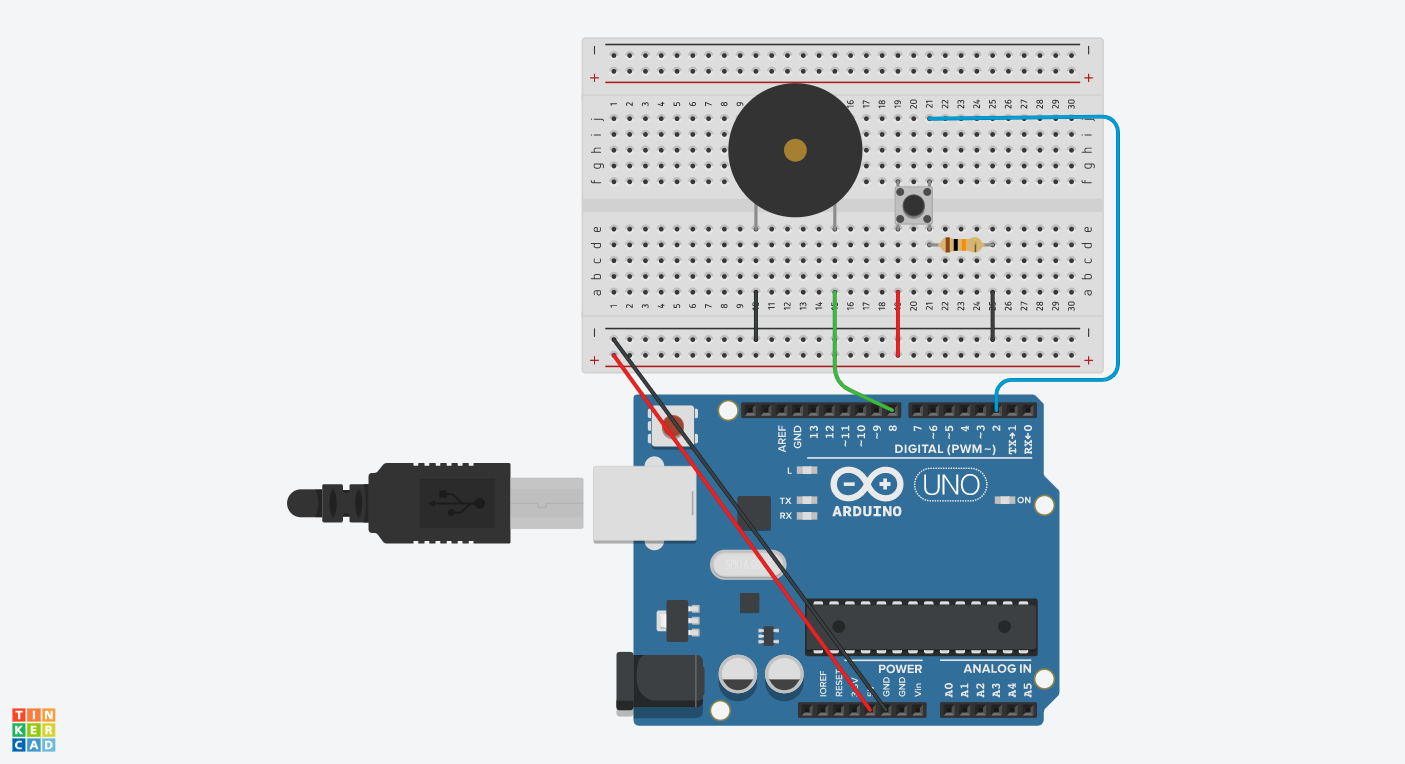
Making music with a microcontroller can be fun and simple! For this project, we're using a pushbutton to trigger a melody played over a piezo speaker, à la Kraftwerk, Pocket Calculator. I'm sure you remember how it goes, "by pressing down a special key it plays a little melody" (Karl Bartos, Ralf Hütter, Emil Schult, © Sony/ATV Music Publishing LLC, Warner Chappell Music, Inc.). The model here is more a faithful representation of a basic door bell, rather than a calculator. Simply push a button and a chime or melody will play.
For this project you will need: 1x Arduino Uno R3 microcontroller 1x breadboard 1x piezo speaker 1x pushbutton 1x resistor (10kΩ) several jumper wires Assemble the circuit in accordance with the diagram below:
Here's the code for you to hack (view content in browser to see code example). Lines 13 through 20 make up the melody. After each tone() function is called, a delay() function is used to determine the duration of the tone.
Try creating your own melody and have fun!
This is a simple Python program for a BBC micro:bit microcontroller that plays a random melody in the key of CM (view content in browser to see code example). All you need for this program is a micro:bit and a power source. The program makes use of the music and random micro:bit libraries and chooses pitches from a defined list. Flash it to your micro:bit and give it a try!
|
WELCOME TO
|


 RSS Feed
