
|
Welcome to Part 2 of the Learning Modular Synthesis tutorial series! In Part 1 we assembled a basic patch using 3 modules: a sequencer for determining the sequence of notes, a voltage controlled oscillator (VCO) for generating sound, and a voltage controlled amplifier (VCA) for controlling the amplitude or volume of our sound. We assembled our patch in 3 virtual modular synthesizer environments, including: VCV Rack, Voltage Modular, and Softube Modular. In this, Part 2, we'll continue patching and will include a low-pass, voltage-controlled filter (VCF) in our patch. Before we dive into our patch, let's define what filtering is. In an audio context, filters are usually thought of as cut-only devices, intended to remove a selection of the frequency spectrum. In synthesis, the 3 common types of filters are: low-pass filters (which remove frequencies from the top of the frequency spectrum, high-pass filters (which remove frequencies from the bottom of the frequency spectrum, and band-pass filters (which allows a variable-width band of frequencies - referred to as "Q"). Filtering differs from equalization in that eqs (equalizers) increase or decrease the amplitude of chosen frequency ranges. The filters we use in synthesis are much akin to the filters used in telecommunications. If you're interested in the relationship (and love electrical engineering and math!), check out the NASA Technical Note titled, "A Digitally Controlled Very High Frequency Synthesizer" available at ntrs.nasa.gov/api/citations/19710024688/downloads/19710024688.pdf. This article discusses the use of a filter to remove "ripples" from an oscillator signal. This is a common filter application in analog telecommunication devices. Let's look at the block diagram for our patch: 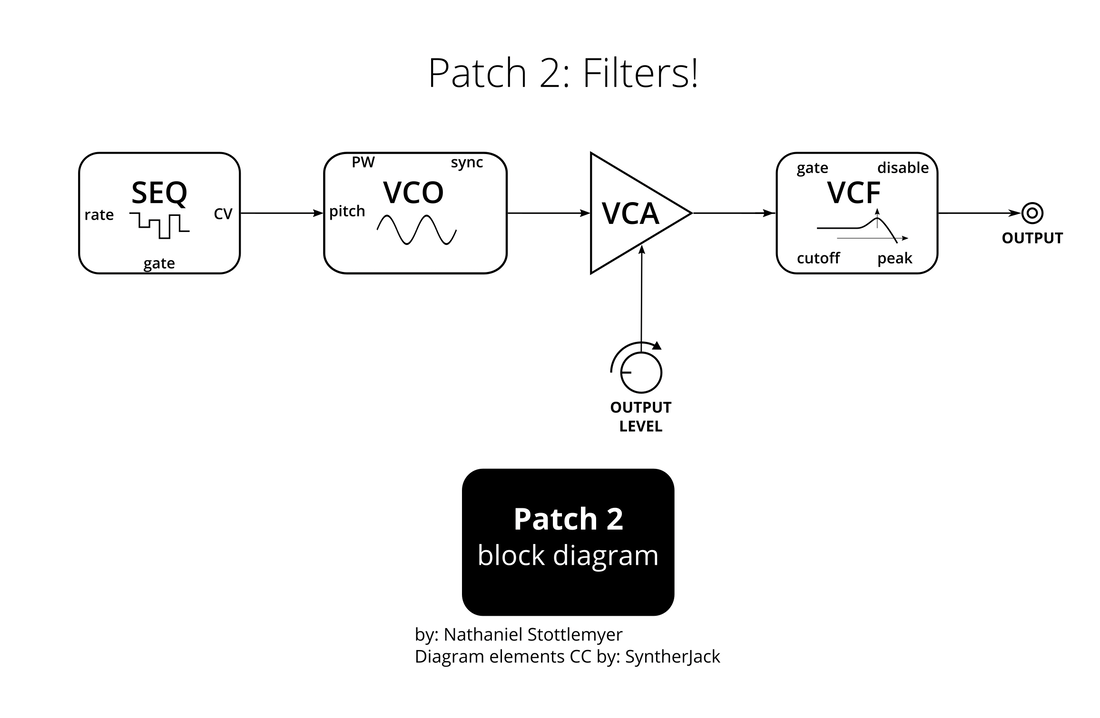 In this patch, the sequencer (SEQ) is sending a control signal (control voltage/CV) to the oscillator (VCO) to control the sequence of pitches. The VCO is outputting the audio signal as a sine wave to the amplifier (VCA). The user is able to control the volume of the VCA using the output level potentiometer/knob which is then sent to the low-pass filter (VCF). The filtered signal is then sent to the output. The output on a computer uses a digital audio converter (DAC) to send the signal to the speaker or headphones. Like Part 1, we'll look at this example in some virtual modular synthesizers. We'll begin with VCV Rack, an open-source Eurorack simulator (https://vcvrack.com/). This software is free to download and for this example, I'm using only fundamental modules which are included for free. 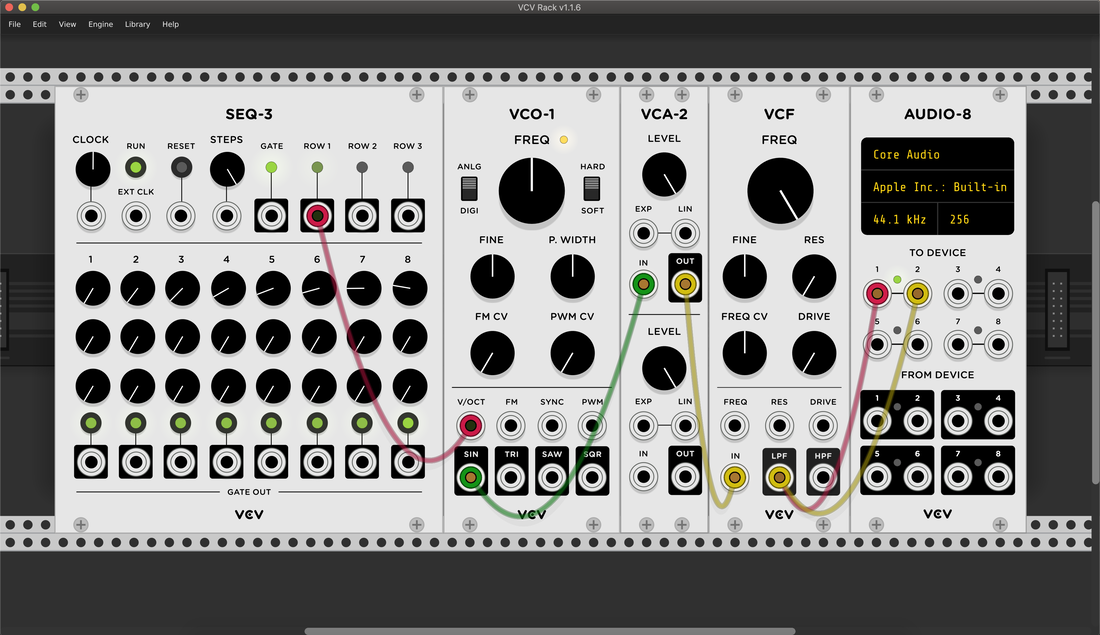 Image: Nate Stottlemyer In my VCV Rack patch, I've connected the ROW 1 output of the sequencer (SEQ-3) to the V/OCT input of the oscillator (VCO-1). This is the control/CV signal. I've also changed the knobs on row 1 (the top row) of the SEQ-1 to change the pitch of each of the 8 steps. Next, I've connected the SIN output of VCO-1 to the IN of the amplifier (VCA-2). This is an audio signal. Next, I've connected the OUT of the VCA-2 to the IN of the voltage-controlled filter (VCF). Lastly, I've connected the LPF (low-pass filter) output to inputs 1 and 2 (left and right respectively) of the AUDIO-8 interface. Notice that the VCF also has a HPF (high-pass filter) output. The AUDIO-8 interface sends the signal to the DAC. Make sure to select an output (second line of the AUDIO-8 display). Next, let's see the patch in Voltage Modular (https://cherryaudio.com/voltage-modular). Voltage Modular is commercial software, however since the COVID-19 pandemic, Cherry Audio has made the Nucleus bundle of Voltage Modular free. All of the modules I use in this example are included free with the Nucleus bundle. 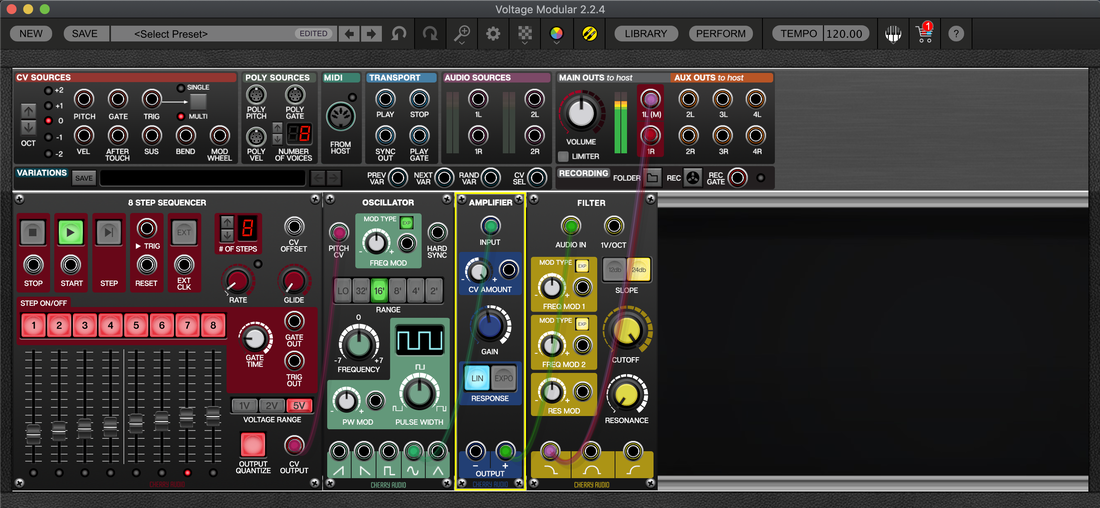 Image: Nate Stottlemyer Just like in Part 1, my Voltage Modular patch is very similar to my VCV Rack patch. Here, I've connected the CV OUTPUT of the 8 STEP SEQUENCER to the PITCH CV input of the OSCILLATOR and changed the sliders of the sequencer to change the pitch of each of the 8 steps. Next, I've connected the sine wave output of the OSCILLATOR to the INPUT of the AMPLIFIER and then connected the OUTPUT of the amplifier to the AUDIO IN of the FILTER. This filter has three output types: low-pass, band-pass, and high-pass. I've connected the low-pass output of the FILTER to the MAIN OUTS L and R. This sends the signal to the DAC. Lastly, let's see this patch in Softube Modular (https://www.softube.com/modular). Just a reminder from Part 1, Softube Modular is commercial software and is available for $89 which includes a number of modules, with several expansions available for purchase. Also remember that Softube Modular can only be used as a plugin inside of a DAW. Softube Modular fantastically emulates a number of hardware modules. The Doepfer modules I use in this patch are included with the software. 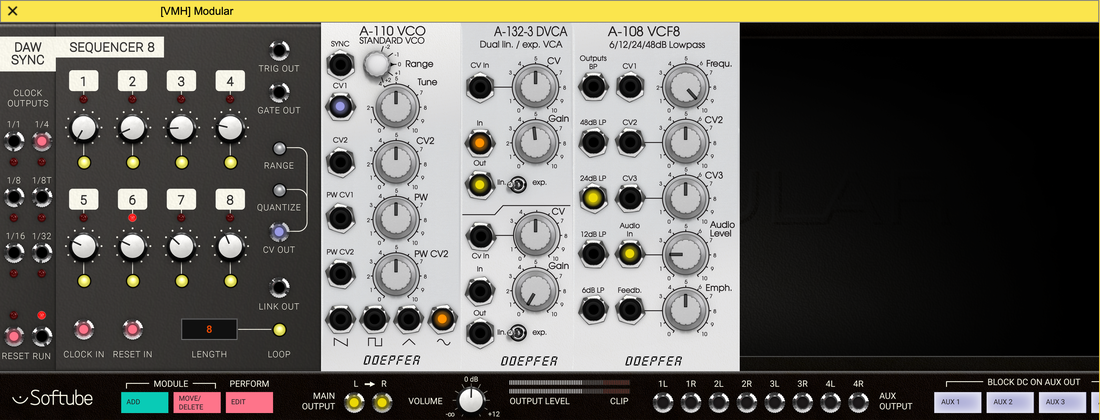 Image: Nate Stottlemyer I've included the DAW SYNC module to synchronize the transport and tempo from the DAW by connecting the 1/4 CLOCK OUTPUT of the DAW SYNC to the CLOCK IN of the sequencer (SEQUENCER 8) and the RESET out of the DAW SYNC to the RESET IN of the sequencer. Now in alignment with our block diagram, I've connected the CV OUT of SEQUENCER 8 to the CV1 input of the oscillator (A-110 VCO) and changed the knobs of the sequencer to change the pitch of each of the 8 steps. Next, I've connected the sine wave output of the A-110 VCO to the In of the amplifier (A-132-3 DVCA) and the Out of the A-132-3 DVCA to the Audio In of the A-108 VCF8 low-pass filter. To complete the patch, I've connected the 24db LP output to the MAIN OUTPUT L and R. This sends the signal to the DAC.
Further Thoughts: Filters have incredible nuances and significant impact on the sound of your patch! Try applying the filter to your patch with different oscillator outputs. The filter has different effects on different wave types. Analog filters also have the ability to self-oscillate, which is wonderfully modelled in VCV Rack and Softube Modular. To make a filter self-oscillate, turn down the amplitude of (or disconnect) the signal entering the filter and turn the resonance all the way up. The filter knob will now sweep through frequencies. With the right amount of amplification, you can create interesting polyphonic textures! Have fun continuing with modular synthesis and stay tuned for the next part!
0 Comments
Your comment will be posted after it is approved.
Leave a Reply. |
WELCOME TO
|
 RSS Feed